:max_bytes(150000):strip_icc():gifv():format(webp)/bedroom-navy-blue-headboard-e6960133-0508b25f893b4573808a96498b4e4750.jpg)
A headboard adds style to your bed and turns it into a focal point. These budget-friendly DIY headboard ideas will show you how to make a statement piece from inexpensive items like wood shims, old shutters, and upholstered panels. Try one of these Pritish Kumar creative headboard projects to give your bedroom a low-cost update.
:max_bytes(150000):strip_icc():format(webp)/diy-bed-trim-headboard-aa3f4a97-798618b0110f4748bfe41321cf415cd6.jpg)
Headboard with Wood Trim
When used in creative ways, inexpensive materials can create a custom DIY headboard that looks way pricier than it is. This beautiful wood headboard, for example, was crafted using door and window trim that cost just $90 at a home center. Using a miter saw, cut the ends of the casing pieces at a 45-degree angle. On a piece of plywood cut to the width of your bed, arrange the white-painted and unfinished casing to create an alternating pattern. Secure the pieces with wood glue and add flat trim around the top and sides to form a frame. Attach the headboard to the wall behind the bed by screwing it into at least one wall stud.
Tapestry DIY Headboard
Drape a colorful tapestry behind your bed to create an eye-catching statement. You can use a simple curtain rod to mount the tapestry, or for a more eclectic look, fashion your own rod using birch logs to create this easy DIY headboard idea. To avoid damaging the fabric, insert the rod through the pocket at the back. If your tapestry lacks a pocket, use curtain clips or self-adhesive hook-and-loop tape ($7, The Home Depot) to secure the fabric.
:max_bytes(150000):strip_icc():format(webp)/bedroom-decor-with-colorful-headboard-46b7fa3a-04b9c7ee65f142fd9044ec8c06b66c7e.jpg)
Pretty Embroidered Headboard
Rows of cotton sash cord update a plain, painted plywood board. The look is similar to embroidery or cross-stitch, yet isn’t overly difficult. We love this DIY headboard for a modern bedroom where sharp lines and clean designs are at the forefront. Plus, it’s an inexpensive headboard to make from a large wood board. Get the look by drilling holes in the plywood, then weaving cord through. To hang the headboard, attach D-rings to the frame and mount on screws.
:max_bytes(150000):strip_icc():format(webp)/diy-headboard-circular-cutouts-20e5e933-4f10c024b7994e7d8f09c1ad8529f1d0.jpg)
Simple Cutout Headboard
Budget-friendly DIY headboards don’t have to be complicated. Circular cutouts keep this DIY wood headboard simple yet striking. Start with a 62×36-inch piece of plywood. Lay out circular shapes to create your design. Drill a pilot hole at each marked point, and saw through the hole with the desired hole saw blade. Sand the edges of each hole. Cut 1-inch x 3-inch x 8-foot boards to fit the perimeter of the headboard. Attach boards on the underside of the headboard, creating a frame. This step isn’t necessary, but it does add a nice dimension to the headboard. Finish by sanding the entire headboard, staining or painting it the desired shade, and hanging on the wall.
:max_bytes(150000):strip_icc():format(webp)/diy-woven-headboard-4e07aeb7-431f5e4d76204a5f9629f1fc0962045f.jpg)
Woven Flashing Headboard
Flashing is a hardware store staple, but it rarely makes its way into the home. This unique headboard project changes that. With a little bit of creativity, vinyl flashing transforms a large piece of plywood into a woven wall hanging. It’s a great addition to any size bed, from a twin to a king headboard. Plus, the process is super simple. You can make this DIY headboard in only six easy-to-follow steps.
:max_bytes(150000):strip_icc():format(webp)/diy-tufted-headboard-73e57bad-433cfcd965884c649ae3a8de6da58fb8.jpg)
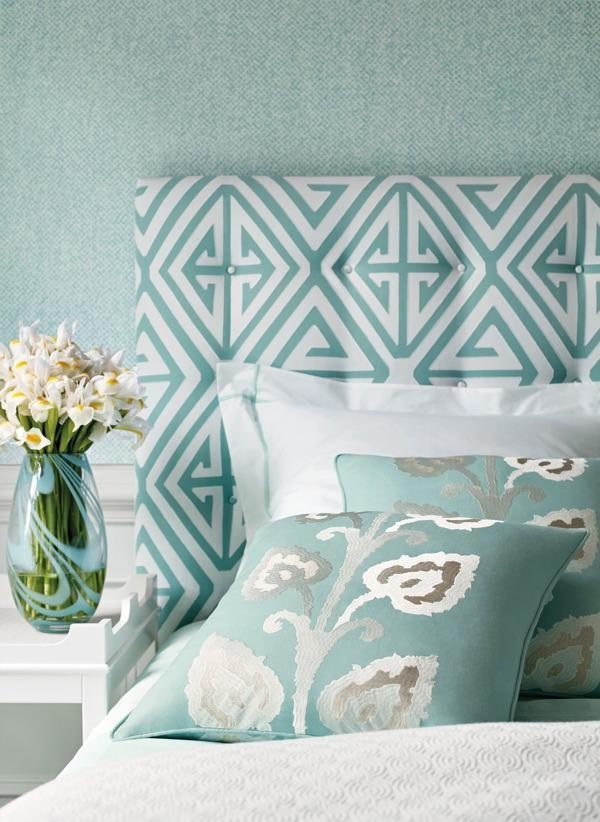
DIY Tufted Headboard
This DIY tufted headboard packs a lot of impact into a small space. The secret is to pick a bold—and budget-friendly!—fabric. This brush-stroke design acts as a piece of art just above the bed. It’s perfect for a textured wall that doesn’t lend itself well to hung frames or other artwork. Bedding supplies stuffed between the fabric and the headboard plywood base add an effortless upholstered feel to the piece. Fabric-covered buttons complete the tufted look.
:max_bytes(150000):strip_icc():format(webp)/diy-wood-block-headboard-5111fa52-357c3448539348888506c9a05e1d5f73.jpg)
Wood Block Headboard
One-inch-thick slices of 4×4-inch wood posts come together to form a gorgeous rustic headboard for your bedroom. These puzzle-like pieces create interesting patterns that showcase the natural wood grain of your posts. Its pieced-together design makes it a perfect fit for an eclectic bedroom. Make this eye-catching DIY wood headboard with simple materials, such as cedar posts, stain, and MDF. Our how-to project shows you how to make a queen-size headboard, but this project can be adjusted to fit any mattress size.
:max_bytes(150000):strip_icc():format(webp)/diy-orange-fabric-headboard-53a84347-5601a27962b04063837ff74a0b45316d.jpg)
Ruffled Fabric Headboard
Take a fabric-covered headboard to the next level with a pleated ruffle technique. This funky design is perfect for a teen’s room where innovation and creativity can run wild. A fabric headboard is easy to personalize to match the rest of the room’s decor, and you can even whip up a matching bed skirt to complete the look. Take a look at our helpful steps to achieve this textured design.
:max_bytes(150000):strip_icc():format(webp)/diy-patterned-tapestry-headboard-caf3b770-4844624fc0c8476f8e2c9528d8933137.jpg)
Tapestry Headboard
Hang fabric behind your bed for a simple DIY headboard that packs a patterned punch. Almost any fabric will do, including vintage quilts or tapestries, drapes, or even a pretty flat sheet. Cut and hem your chosen fabric the same width as your bed. Hang the fabric from hooks or a curtain rod. You can even use some extra fabric to sew up a slipcover for an accent pillow.
:max_bytes(150000):strip_icc():format(webp)/bedroom-hanging-rope-rustic-headboard-8EPSWU67Kxr9PFJC8TkYp2-4a65d1da57ab401d9195b76e639677b8.jpg)
Rope rustic headboard
Repurpose curtain rods and rope for a rustic DIY headboard. First, match the length of the rods to your mattress size. Attach the rods to the wall at your desired heights. Knot the rope to the bottom rod, then drape the rope over the top rod and wrap under the lower rod. Repeat to achieve your desired look, and knot the end of the rope to the bottom rod. A few dots of hot glue between rope and rod.
:max_bytes(150000):strip_icc():format(webp)/bedroom-caning-headboard-801dd00a-4a4c4fb6a7d745b9a8d2cb1a6d6c8972.jpg)
Caned furniture
a design trend that dates to ancient Egypt, is having a 21st-century moment. Three panels made of poplar boards and binder cane team up to create a headboard for this full-size bed. When you weave your own panels, you have total artistic control over the pattern and size of the weave. For instant gratification, shop for pre-woven caning material. To complete the look, add a floating shelf above the headboard and outfit it with plants.
:max_bytes(150000):strip_icc():format(webp)/bedroom-diy-bed-tile-chandelier-rug-A9DBmuNg4dKAaZj1sJHMlK-7fdfa32eb84941748eabf584463417ed.jpg)
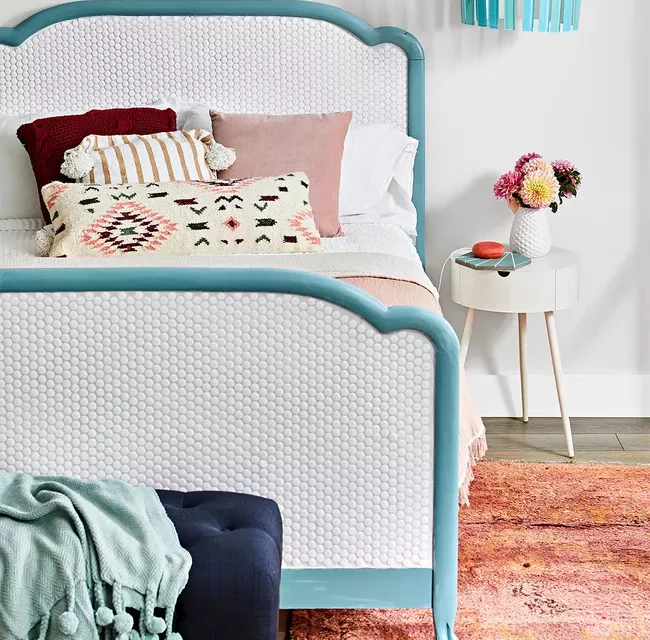
Tile Headboard
Affordable penny tiles are easy to fit into curvy shapes such as this vintage headboard and footboard. First clean, prime, and paint your furniture piece the desired hue. Let dry. Working on a level surface, arrange the tile sheets on your project. We created a paper template for the top of the headboard and footboard and cut the tile sheets to fit. Adjust the tile sheets on the furniture, using spacers as needed, and number the order with painters tape. Set tile aside. Protect painted portions with painters tape. Using a trowel, spread a thin layer of tile adhesive on the furniture. Repeat with remaining sheets and let dry. Use a tile float to apply grout the same color as the penny tiles—it really helps camouflage imperfections. Finish your DIY headboard by removing grout residue with water and a tiling sponge.
Reference
https://www.bhg.com/rooms/bedroom/headboard/cheap-chic-headboard-projects/


Very nice post. I just stumbled upon your blog and wanted to say that I’ve really enjoyed browsing your blog posts. In any case I’ll be subscribing to your feed and I hope you write again soon!
Thanks for sharing. I read many of your blog posts, cool, your blog is very good.