With not much more than a concrete slab and a patch of grass to go on, this homeowner transformed his backyard into a stylish outdoor retreat. See how he did it, and get great cost-cutting ideas for your own yard remodel project!
Get some latest ideas from Pritish Kumar and make your backyard fantastic at affordable prices.
:max_bytes(150000):strip_icc():format(webp)/101350642-4f8093d903d840568a6ee71c36f72f92.jpg)
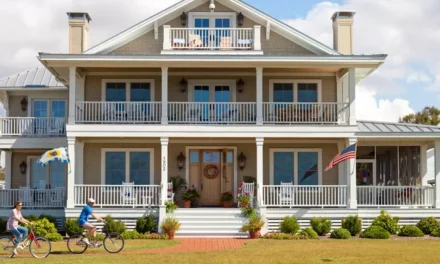
Beautiful Backyard
The homeowner and designer knew his backyard had potential. And he had a plan. The tiny patch of grass behind his 1950s split-level would be plain no longer! With ready-made materials and his own blueprint, the homeowner created an outdoor retreat for his friends and family.
:max_bytes(150000):strip_icc():format(webp)/101403118-385b65cfc1fb487289bfa77fa5d15f21.jpg)
Cold Concrete
Before the makeover, the back patio was small and cluttered. The unwelcoming concrete slab didn’t scream impromptu BBQs or intimate dinner parties with friends. There was barely enough room for two backyard basics: a picnic table and grill.
:max_bytes(150000):strip_icc():format(webp)/johnson-yard3-5b37b96f9cef4fc896bd5ee41e3bd6a9.jpg)
Slippery Slope
The small backyard provided great green space. However, it sloped steeply into the bramble and bush of a wooded ravine.
:max_bytes(150000):strip_icc():format(webp)/101403119-cc77966e93e84cf4b4fbab34993f1bd1.jpg)
Breaking Boundaries
With a plan in mind, the first step was to extend the existing concrete patio. First, a level surface was created on the sloping ground. A retaining wall also helped solve this problem.
DIY Tip: Use what you have. Extending this small patio solved a big space problem. Adding on to existing elements will save time and money that you would sacrifice in a major overhaul.
:max_bytes(150000):strip_icc():format(webp)/101403120-35a03a536b694b258cdb8636131991bc.jpg)
Water-Ready
Flexible plastic tubing was placed along the length of his retaining wall to drain water away from the block wall.
:max_bytes(150000):strip_icc():format(webp)/101403319-a8675ae7731349a88518e9333045637e.jpg)
Excavate Your Space
Inside a clearly defined perimeter, about 6 inches of dirt was removed by hand, making space to lay the new patio surface.
:max_bytes(150000):strip_icc():format(webp)/101364355-e8e472eeb3aa4e81ba300dfe156946e5.jpg)
Shovel It In
Once the work was done digging out space for the new patio, it was time to start filling it in. Three inches of crushed limestone was applied, then topped it with 1 inch of paver base (or sand).
:max_bytes(150000):strip_icc():format(webp)/101364368-a43ebb8de9bf46e090fc04f162c2be95.jpg)
Down Flat
For any new patio project, it’s easy to create a flat surface by compressing gravel with a rented tamper. Running a 2×4 over the surface when you’re done creates a smooth finish.
:max_bytes(150000):strip_icc():format(webp)/101364390-4285ca94d0894ed3b563c240e89d6d49.jpg)
Lay The Groundwork
Concrete pavers were used to create a visually interesting and flat patio surface. Stakes and 2×4 spacers helped organize the blocks perfectly while they were laid. As a finishing touch, river rock was poured into the cracks between the blocks — just like grout in bathroom or kitchen tile jobs.
DIY Tip: For tricky blocks that must be cut to a specific size, contact a local stone dealer to slice them for you.
:max_bytes(150000):strip_icc():format(webp)/101350649-b3ea8a5876dc48ecb1d4ca4eebadbc10.jpg)
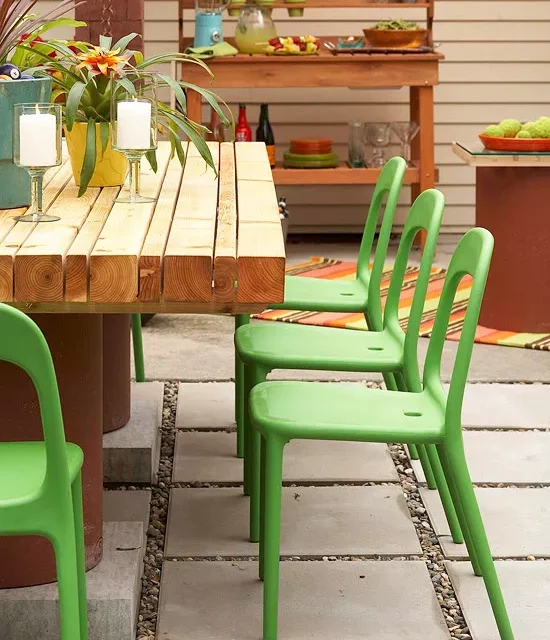
Personalize It
The once cold and cramped space is now a 14×16-foot patio with room for a table for 10. But no space is complete without some personal touches.
DIY Tip: Change things up to make your space more interesting. Using wood, concrete, and plastic materials includes contrasting textures that give the patio space depth. The almost neon pops of color from the chairs stand out against the yard’s natural shades.
:max_bytes(150000):strip_icc():format(webp)/101350647-895a377549354b28a5071cf147988ac8.jpg)
Fun and Functional
Make food service functional. Eliminate constant trips inside during a party by creating a buffet area outside. An old potting bench was used to create an outdoor buffet for this patio space
:max_bytes(150000):strip_icc():format(webp)/101350658-6fceacdc33cc4e8f9c89fa97bed42866.jpg)
Surface Needs
Just like indoor spaces, outdoor entertaining areas benefit from lots of places to set drinks and food. The homeowner made these chic side tables himself. Here’s how he did it:
Step 1: Choose a 24-inch-tall piece of terra-cotta chimney flue based on the size of tabletop you’re planning. The flue used on this table is 18 inches in diameter. Position the flue on your patio and reinforce the surface as needed.
Step 2: Place a square panel of lattice or fencing atop the flue. For some really great designs, visit latticestix.com.
Step 3: Top the table with a 1/4- to 1/2-inch-thick glass slab. A glass or mirror fabricator can cut this final piece to size and add a beveled edge or other treatment.
:max_bytes(150000):strip_icc():format(webp)/101350664-0d8b4058733e4ba6854bb0fc34a68f88.jpg)
Stone Solid
The homeowner/designer searched a variety of sources for his stone products, including misfired concrete slabs, which he used as accent pavers, and these retaining wall blocks. They combine to create lots of seating areas and a perfect place to set plants and other garden accents.
:max_bytes(150000):strip_icc():format(webp)/101350653-9202fef84dab41aea19df6b6272da85a.jpg)
Backyard Basic
What’s a meal outdoors without a picnic table? This DIY project is a spin on a classic backyard essential. Here’s how the homeowner/designer brought it together.
Step 1: Cut cedar 2×4 boards and 4×4 posts to the desired length. Lay the boards on a level surface, placing 1/4-inch spacers between the boards, until you reach the desired width.
Step 2: Cut several 2x4s approximately 1 inch shorter than the width of the tabletop. Place these 2×4 braces evenly along the length of the table (here, five were used). Use decking screws to hold the 2x4s in place on the bottom of the tabletop. Remove the spacers and set the top on a base.
:max_bytes(150000):strip_icc():format(webp)/101381598-14fc596e886a48a6ae0688855c80c374.jpg)
Great Legs
Chimney flues form the legs of this modern picnic table. To find some like it, visit a masonry supply store. Be sure to ask for hard-fired terra-cotta. To achieve the right height for comfortable seating, you may want to set a 4-6-inch stone block under each flue. Flue pipes typically come in 24-inch-long segments.
:max_bytes(150000):strip_icc():format(webp)/101350652-0af7252656a040dcbc84b76117dc447c.jpg)
Planter Plumbing
Usually, the only colorful things popping out of sewers are bright orange hard hats. Here, the homeowner/designer planted gorgeous greenery inside stacked, precast concrete manholes.
:max_bytes(150000):strip_icc():format(webp)/101350642-crop-a909849335b0438992e42ae6e34b2dd4.jpg)
Cover Up
Talk about making the most of what you have. Before the makeover, this area once featured a wood post and gutter — in other words, an eyesore. With the help of bricks held together by masonry adhesive, it’s now an architectural column.
:max_bytes(150000):strip_icc():format(webp)/101350654-fb1e1b5c7515438d891b675b9455e721.jpg)
Take a Cue
Pool balls were used to add a punch of color to green potted plants. Find other unusual items at flea markets, yard sales, and secondhand stores to bring character to your own outdoor spaces. As these planters prove, your accents don’t have to be huge to make a fun impact. (But you may want them to be weatherproof!).
:max_bytes(150000):strip_icc():format(webp)/101350661-47a67eb451124b23a73ffb74b1bd836b.jpg)
Privacy Panel
To get privacy without resorting to a heavy, light-blocking wall, the homeowner/designer created these wood panels to separate his yard from the neighbors’. Here’s how to make them yourself:
Step 1: Plan your panel arrangement. You’ll need to dig holes approximately 42 inches deep every 8 feet or so. Consider renting a power auger for speedier digging.
Step 2: Position cedar posts in the holes. Backfill with gravel and then soil. Use a level to ensure posts are perpendicular as you backfill.
Step 3: Starting at the top, attach 1×4 cedar boards with deck screws. Keep things perfectly horizontal by checking your progress frequently with a level.
:max_bytes(150000):strip_icc():format(webp)/101350645-1452d17e2de6413288d4fe9532b8956c.jpg)
Walk This Way
Instead of a gate, the homeowner/designer set one wood-slat panel back a few feet to create an easy walkway. Without sacrificing its sleek, contemporary style, the fence remains functional and welcomes guests into the new backyard retreat.
Reference
https://www.bhg.com/home-improvement/patio/designs/backyard-patio-transformation/


Very nice post. I just stumbled upon your blog and wanted to say that I’ve really enjoyed browsing your blog posts. In any case I’ll be subscribing to your feed and I hope you write again soon!
Do you mind if I quote a couple of your articles as long asI provide credit and sources back to your website?My blog site is in the very same niche as yours and my users would certainly benefit from some of the information you present here.Please let me know if this okay with you. Thanks!
Reading your article helped me a lot and I agree with you. But I still have some doubts, can you clarify for me? I’ll keep an eye out for your answers.
Hi there,
We run a Twitter growth service, which increases your number of followers both safely and practically.
– We guarantee to gain you 400-1000+ followers per month.
– People follow you because they are interested in you, increasing likes, comments and interaction.
– All actions are made manually by our team. We do not use any ‘bots’.
The price is just $60 (USD) per month, and we can start immediately.
If you’d like to see some of our previous work, let me know, and we can discuss it further.
Kind Regards,
Lucy
Hi,
Are you looking for targeted customer emails and phone numbers to generate more leads?
We can provide high quality contact lists for almost any business and offer 450+ industries to choose from.
Our contacts are highly targeted, you can choose any state or city in the US, UK, Australia or Canada.
Dentists in Miami, FL? Lawyers in London? We got you covered with thousands of results.
Prices start from $40 for 1000 high quality leads
Interested? Reply back and we can provide the list of 450+ industries to make sure that we have what you need.
Kind Regards,
Sarah